Refactoring to React
Since the beginning, CookTime was mainly an ASP.NET Razor page application with a small amount of React, mainly for the very interactive recipe edit page. This was fine for a while, but I’ve been using React more at work and I’ve decided that Razor pages, while good, lack the development maturity, mindshare, and interactivity of React. I’ve resolved to reimplement the CookTime UI as a React single page application (SPA) with these goals:
- Make frontend development interactive with Hot Module Reload (HMR)
- Create re-useable and testable frontend components
- Use proper DTOs instead of marshalling database objects between server and client (exploring using GraphQL for this?).
This post will be a development diary of all the changes necessary to accomplish this goal. Let’s dive in!
Day 1: Getting something running
I’m going to use create-react-app to scaffold the initial state of the client app.
I did this by running npx create-react-app client-app --template typescript at the root of the repo, which gets a React SPA set up in the client-app directory.
Next I need to integrate the frontend development server with the backend server.
This is required only for development though setting it up is a little tedious and confusing so I’ll try my best to explain it to future me.
In production, the ASP.NET server would be serving the SPA as static pre-compiled HTML, JS, and CSS.
This is great because clients can cache resources to make page loads faster and server resources are mostly spent on serving REST calls instead of rendering HTML for the client.
However this means that if we want HMR, the ASP.NET server has to open and maintain a connection to browser clients and push changes to files as they are made.
This used to be the case with Microsoft.AspNetCore.SpaServices.Extensions and to configure it you would have to add startup code like this:
app.Map(
    "/js", ctx =>
    {
        ctx.UseSpa(spa =>
        {
            spa.UseProxyToSpaDevelopmentServer("http://localhost:8080/js");
        });
    });
This tells ASP.NET that any call to a path starting with /js should be proxied to http://localhost:8080/js where, hopefully, a second server is running listing for filesystem events to deliver the nice HMR experience.
In this case, ASP.NET is the first process that receives calls and decides to handle them or proxy them to another process.
The ASP.NET team decided they don’t want to maintain this anymore citing “simplicity” arguments so we have to now invert which process handles the request first:
- Before: ASP.NET sees the request first, if it matches a specific path (like
/js) the request is proxied to the React development server. - After: The React deveopment server sees the request first, if it matches a specific path (like
/api) the request is proxied to the ASP.NET development server.
Same result? Yes. Better? Probably not. Does it make the web development world harder by deprecating a working solution? Yes!
So we replace Microsoft.AspNetCore.SpaServices.Extensions with Microsoft.AspNetCore.SpaProxy and modify our csproj file to tell it how to start the development server.
The full documentation for the new NuGet is here and that page does a better job than me.
With all that done, the standard create-react-app page loads with the spinning Rutherfordian atom.
Success!

Day 2: Authentication and Authorization
Before we get to the fun parts of re-writing the Razor pages as React components, we have to deal with the un-fun features of signing in and authorizing users. Addressing this led me down a rabbit-hole of authentication acronymns and open-ended questioning whether or not you should be able to use your Google account to sign in. In the end, I decided that CookTime will
- Continue to be its own authentication and authorization provider.
- Continue to use ASP.NET Identity cookies to identify users.
The alternative of course would have been to
- Delegate to an authentication provider (like Google, Facebook, Apple, Microsoft, etc…) and implement the correct OIDC flow
- Configure each authentication provider and map claims appropriately so CookTime doesn’t care who provided the JWT.
I simply do not have the patience or desire to setup OAuth authentication for CookTime and if this costs us users then so be it. The whole process is mind-meltingly boring.
Having decided that, I need to reimplement the Identity flows using React components instead of forms for
- Registration
- Sign in
- Sign out
- Password reset
- Email verification
Hoes does ASP.NET authentication actually work?
If you use cookie authentication, the signin process just involves the server setting a cookie in a response.
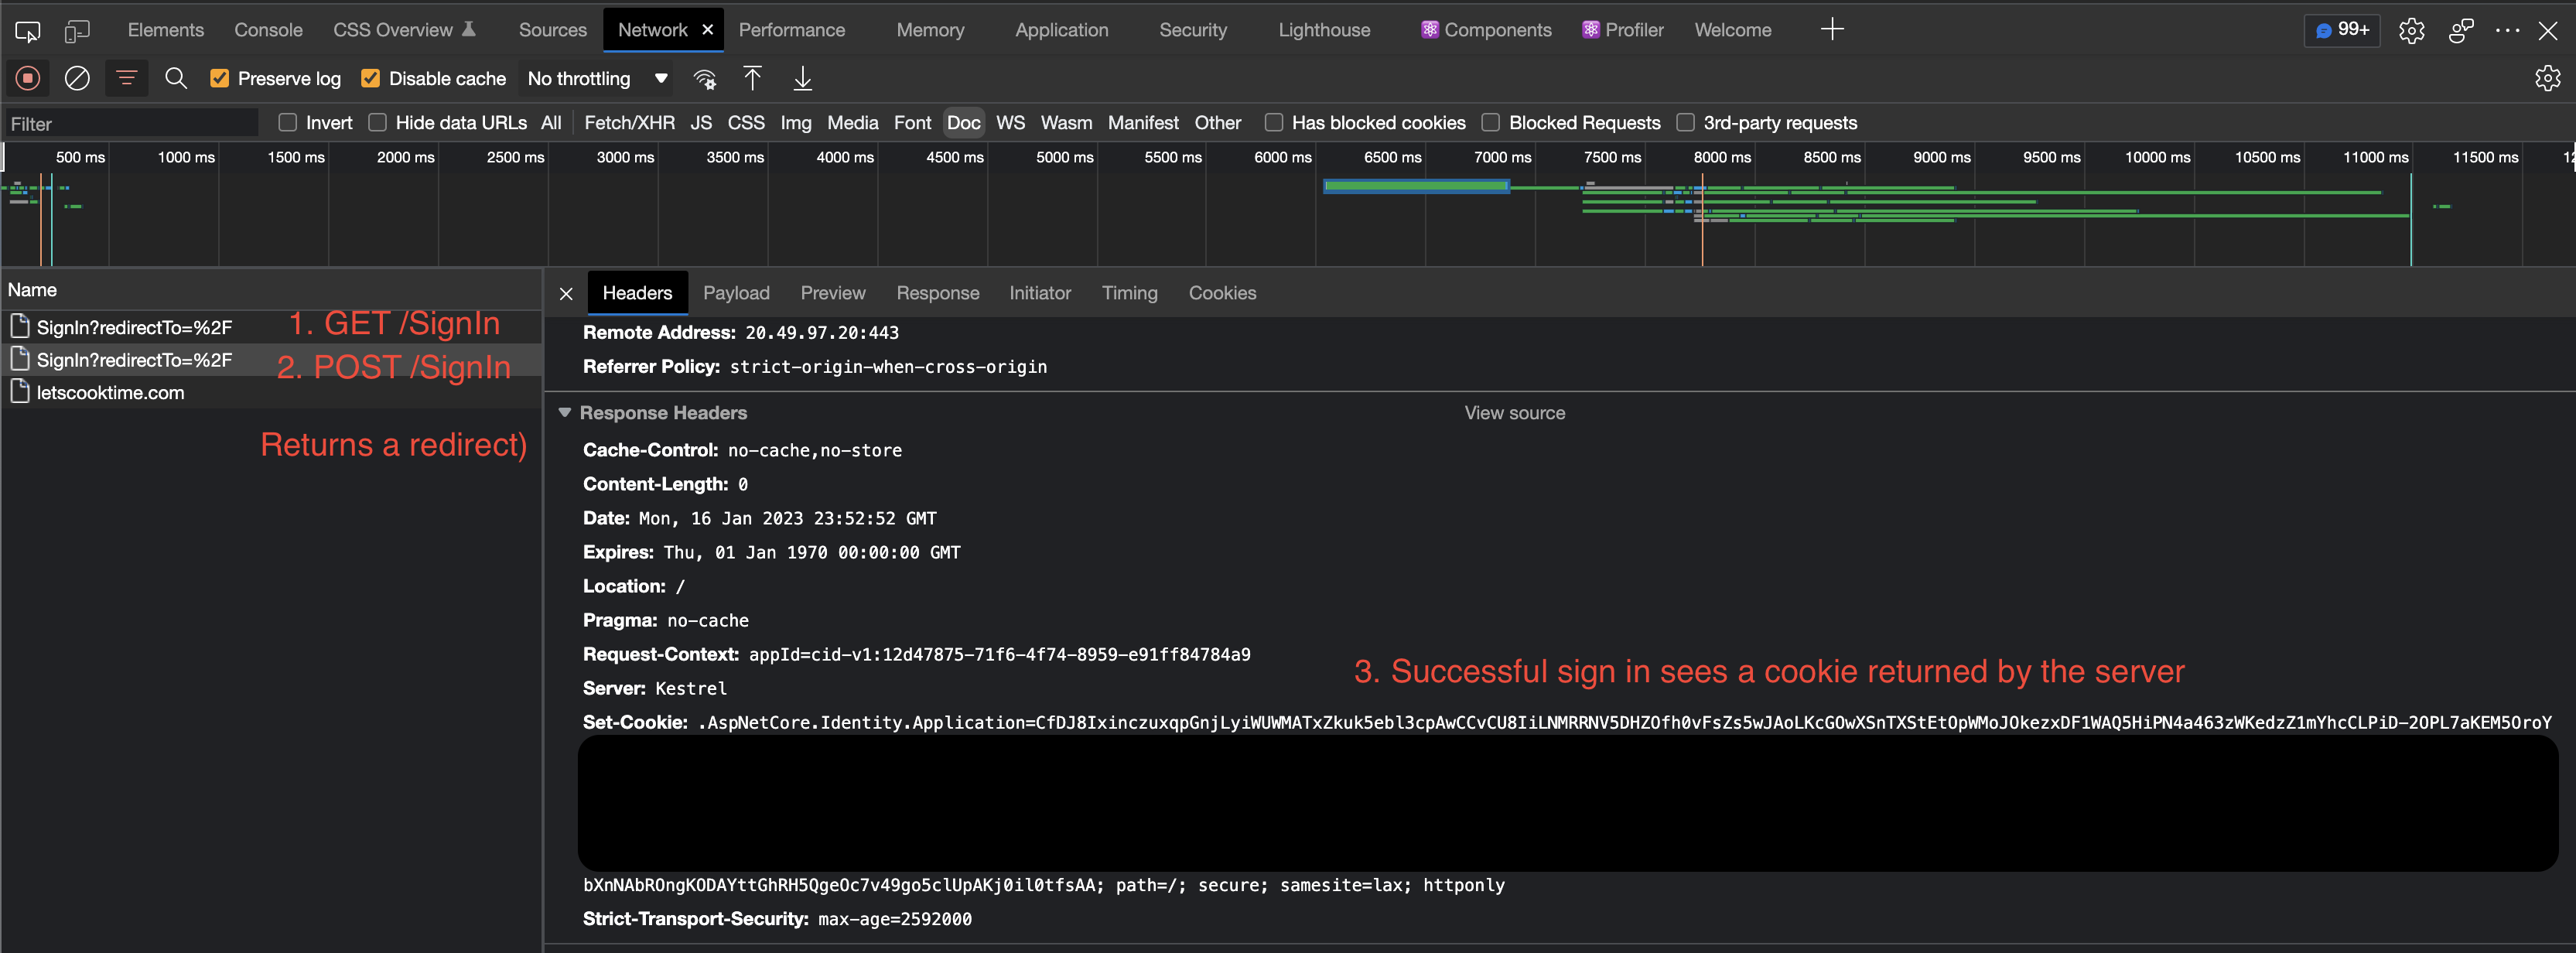
Here’s what happened:
- The client POSTs a signin form with the username and password
- The server responds with an OK and the
.AspNetCore.Identity.Applicationcookie. - The browser stores the cookie and sends it to the server in all subsequent requests in the
Cookieheader.
So how does the server authenticate the user and set the cookie? Something like this:
    [HttpPost("signin")]
    public async Task<IActionResult> SignIn(
        [FromForm] SignIn signinRequest)
    {
        this.logger.LogInformation("Model state is valid, attempting login");
        var user = signinRequest.UserNameOrEmail.Contains('@') ?
            await this.userManager.FindUserByEmail(signinRequest.UserNameOrEmail) :
            await this.userManager.FindUserByUserName(signinRequest.UserNameOrEmail);
        // This is the line that sets the cookie in the response!!!
        var result = await this.signInManager.SignInWithUserName(
            userName: user.UserName,
            password: signinRequest.Password,
            isPersistent: signinRequest.RememberMe,
            lockoutOnFailure: true);

        if (result.Succeeded)
        {
            this.logger.LogInformation("User {Email} logged in", signinRequest.Email);

            return this.Ok();
        }
        else
        {
            return this.BadRequest();
        }
    }
An interesting feature of this particular cookie is that it has the HttpOnly flag set, which means that JavaScript code cannot access this cookie. Even if the client side code could access the cookie, it is encrypted by the server and it wouldn’t be feasible to decrypt it without leaking keys. Without access to a decrypted cookie, our client-side code does not have any actual information about the user. We don’t know their name, what roles they have, any other claims they may have, among others.
To solve this, we need an authenticated request to a route like /profile that basically exchanges a valid authentication cookie with a JWT-like object that contains important claims like the username, roles, claims, etc… So that’s what we will do.
Registration
The registration form is “simple” (Ha! Nothing with authentication is simple!). A user providers the following information (taken from the current sign up form).

Then in the backend, we take this and check to see if a user with the same username or email has previously been registered.
Assuming not, we try to create the user and if their password passes the complexity checks then they get a database entry in the AspNetUsers table.
We also fire off an email to the email provided to validate that this is a real email!
It should be simple enough to:
- Make a React form that accepts these 4 inputs
- POST the information to the server
- Create the user if needed
… A few days later … Indeed I did that and spent a few days in the refactoring jungles so now I will summarize some of the largest changes:
Introducing react-router
Now that we have a SPA, we have to be able to navigate between pages. The most popular library for React to do this seems to be Remix’s react-router so I’ve chosen to use it. The library works like this:
- You define a
routerobject that maps URLs to React component. Previously we relied on Razor page file organization conventions to match URL to Razor pages but now this is done explicitly by the router configuration. - For each route you want to match, you define a React component that gets rendered at that route. These are the site “pages” different from reusable components.
- Replace all
hrefs with a combination ofToandLinkelements fromreact-router. Normally,hrefs make the browser navigate which is verboten for react-router. If you navigate, you are no longer a single-page application!
Having understood react-router, the challenge here was actually rewriting every Razor page as a React page. The UI side of this was really easy, the problem was that we were running a lot of Entity Framework queries in the backend that were never exposed as REST APIs. For most of the pages I had to do something like this:
- Write the react components
- Expose a REST call equivalent to the DB query we were previously performing to render the Razor page
- Make the frontend call the query.
Simple work but it was very laborious.
TODO performance differences?
Render time
Network load
References
- https://developer.mozilla.org/en-US/docs/Web/HTTP/Cookies
- https://jcbaey.com/authentication-in-spa-reactjs-and-vuejs-the-right-way/?utm_source=medium&utm_campaign=spa-authentication